How I Automate Backblaze B2 Backups with Restic on Linux
Table of Contents
Update
I’ve since made a number of updates to this setup to better align with the way my needs have changed. I highly recommend checkout out that post to see how I’m currently doing my Linux backups.
It has now been a few months since I wrote on my photography blog about finally removing Microsoft Windows from my photography workflow. Being that I was already a very heavy user of Linux who only really used Windows on one machine to run the Adobe suite, this has been a pretty painless transition for me. Beyond having to figure out how to make my Photography workflow function under Linux (which is still an ongoing process), I had pretty much everything figured out.
That was, except for automated, off-site backups.
No Longer Using Linux for Photography
Unfortunately, I’ve come to the conclusion that, at least as it stands today, Linux simply lacks the tools necessary for professional-level photo work. I’ve since switched to a Mac for that kind of work.
You see, up until this point, I haven’t had to deal with this problem. My Linux machines mostly haven’t had all that much data that I’ve needed to keep backed up. What data was indispensable, I could just sync to my desktop Windows computer (which was always powered on) and let the automated backup tools on there take care of the rest. Having moved my entire workflow completely to Linux, however, meant having to figure out how to make all of this work again.
This is especially important given that my entire photography archive would now be housed on a Linux machine. Given this, it’s absolutely essential that I have some rock-solid, off-site backups of my data.
In this post I will be sharing the setup I’ve arrived on that utilizes Backblaze B2 cloud storage, the Restic backup software, Healthchecks.io for monitoring, a custom shell script, and a Systemd timer to automate my backups.
This setup has the advantage of being fast, inexpensive, reliable, and secure. It’s completely automated, so I don’t even have to think about it, but it also utilizes Healthchecks.io to alert me if something doesn’t go as planned.
NOTE: If you couldn’t tell by now, I’m only going to be talking about my automated cloud backups in this post. This is just one part of a 3-2-1 backup plan.
With that introduction out of the way, let’s jump right into the setup!
Step 1. Create a Backblaze B2 Bucket and Application Key
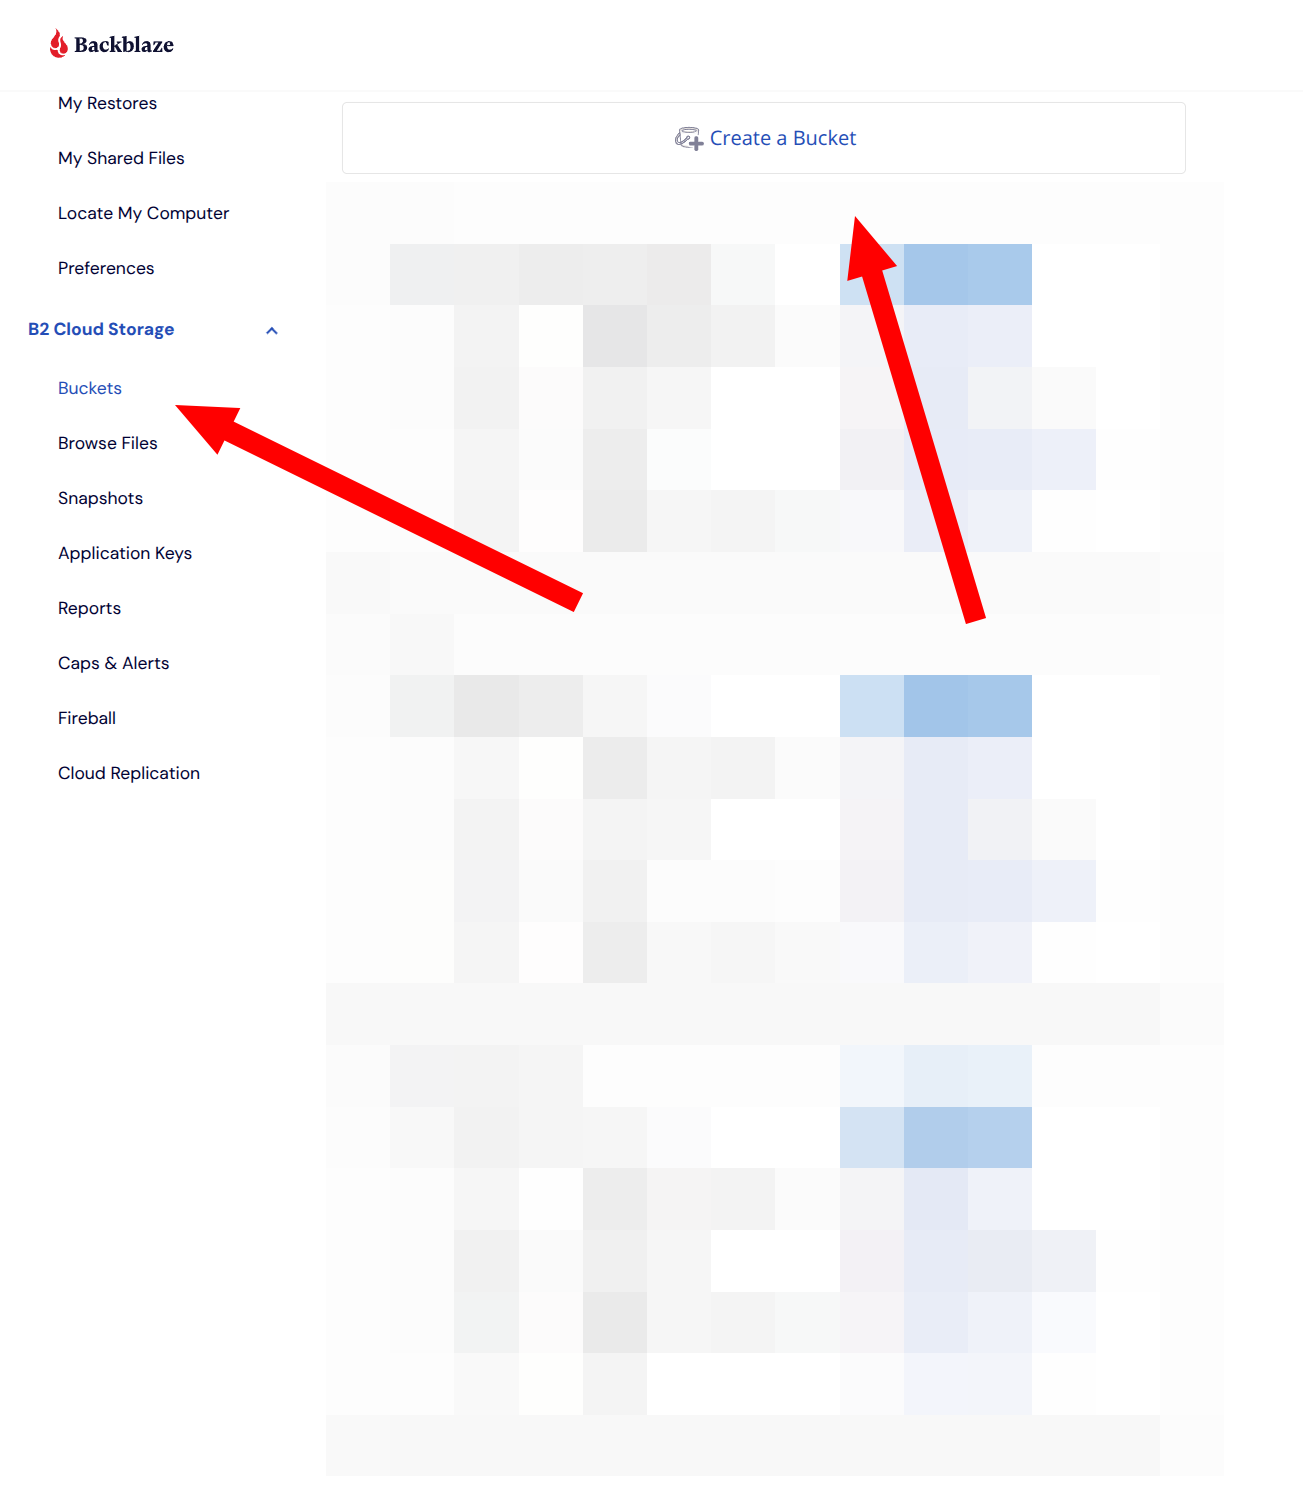
Before we can actually start the process of backing up the data, we need somewhere to back the data up to. This is where Backblaze B2 comes in! Start by logging into your account, clicking on Buckets un the B2 Cloud Storage tab, and clicking the Create a Bucket button.
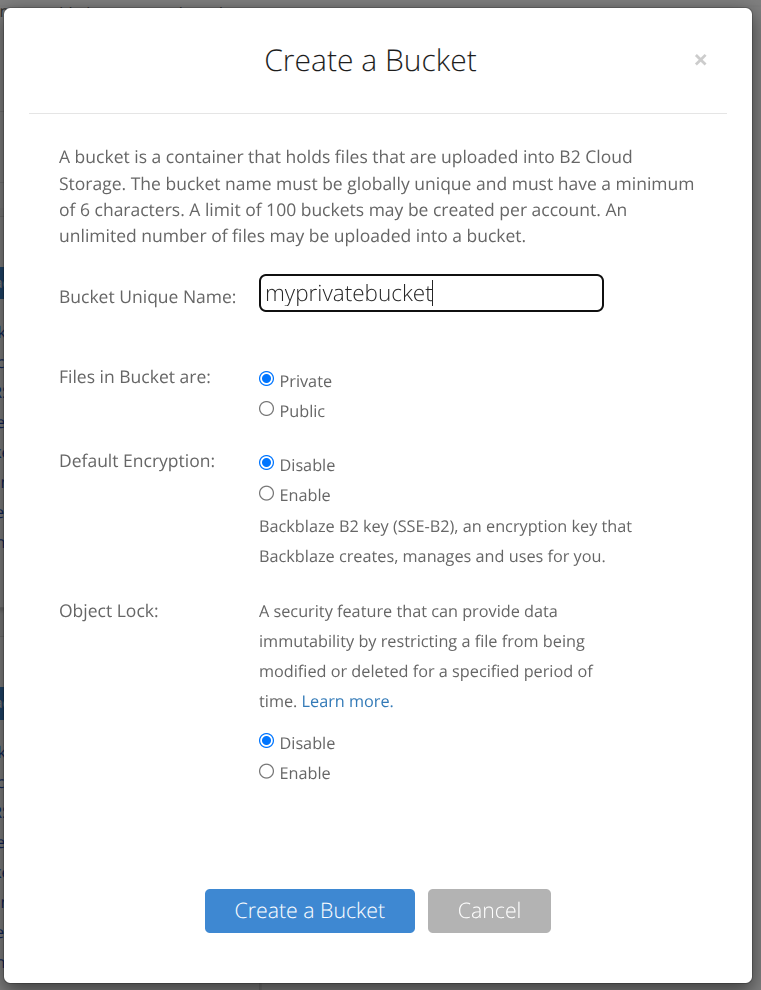
This will open a pop-up to create your bucket. Give it a unique name, which you’ll need again later.
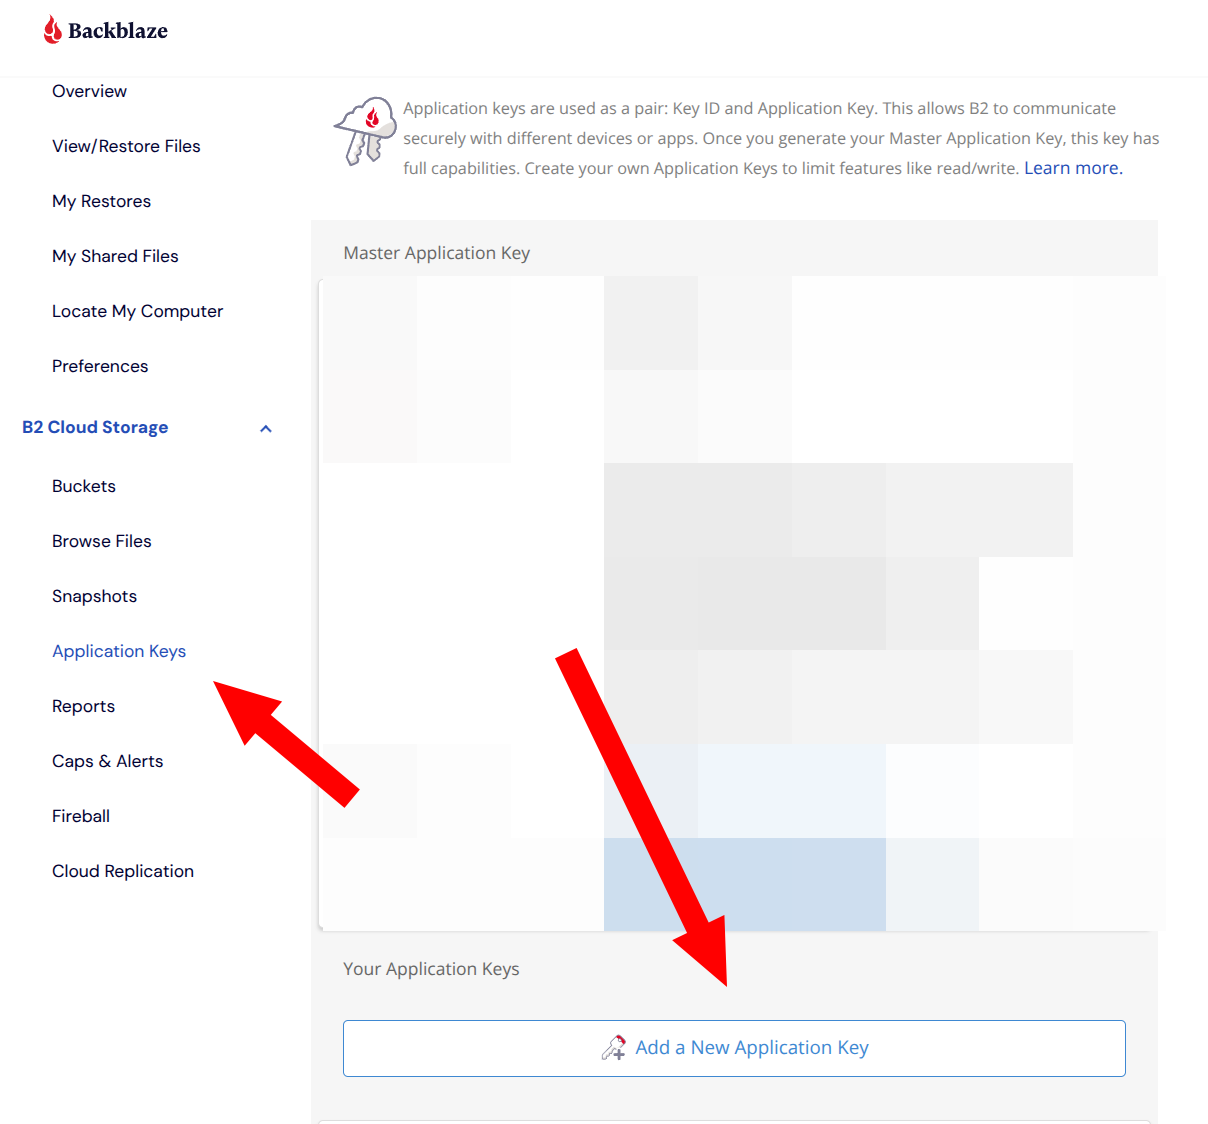
From here, you’ll go to the Application Keys tab and click the Add a New Application Key button.
Set the key to have access to your bucket with read and write permissions. Once you do that, you’ll get a keyID and an applicationKey. Make note of these for later (it’s also worth noting that you want to keep these secret, if that wasn’t abundantly clear already).
Step 2. Set Up Healthchecks.io
Once you have your bucket and access key all set up on Backblaze, you’re ready to get the Healthchecks.io portion set up. From your dashboard, click the Add Check button, which will bring up the window to add a new check. Give it a name, a slug (I just click the use suggested button) and, optionally, some tags (the tags just make it easier to find a check later if you have a bunch of them). You can also adjust the period and grace time if you want, but I expect my backup to run daily, so the defaults of 1 day and 1 hour are fine.
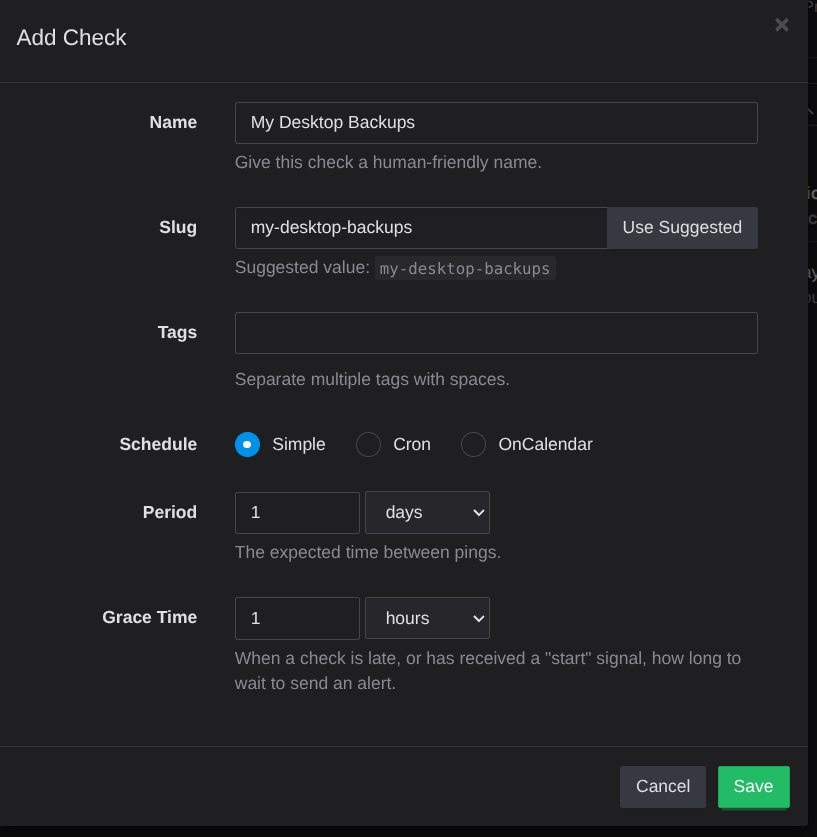
Once you click save, it’ll give you a unique ping URL for your check. Again, make note of this for later.
Step 3. Set Up the Environment Variables
Restic will pull all of the information it needs to access our B2 bucket from a set of environment variables, which we will no set up. To start, let’s add the file that will store these variables:
sudo mkdir -p /root/.restic
sudo touch /root/.restic/b2-credentials
sudo chmod 600 /root/.restic/b2-credentials
Now, simply add the following into the b2-credentials file that we just created:
export B2_ACCOUNT_ID="your_keyID_here"
export B2_ACCOUNT_KEY="your_applicationKey_here"
export RESTIC_REPOSITORY="b2:your_bucket_name_here:/"
export RESTIC_PASSWORD="choose_a_strong_password_for_encryption"
The values of these should be pretty self-explanatory. The only value here that we didn’t get from step 1 is the password you want to use to encrypt your backups.
Step 4. Create an Exclusions File
Strictly speaking, this step is optional, but strongly recommended. You’ll want to create a file at /root/.restic/exclude.txt. Anything in this file will be excluded from being backed up. Here’s a starter excludes file to get you started:
# Cache directories
.cache/
*.cache/
**/cache/
**/Cache/

# Temporary files
.tmp/
*.tmp/
**/tmp/
/tmp/

# Browser caches and data
.mozilla/firefox/*/cache2/
.config/google-chrome/*/Cache/
.config/chromium/*/Cache/

# Development Stuffs
node_modules/
.venv/
__pycache__/
*.pyc

# System garbage
.Trash/
.local/share/Trash/

# Large media caches that we don't care about
.thumbnails/

# Junk from Windows Drives
$RECYCLE.BIN/
System\ Volume\ Information/
Exclusions Format
It’s worth taking a quick aside here to explain the exclusions format for your excludes file. The format is as follows:
- Use
*for wildcards - Use
**to match any number of subdirectories - Paths that start with
/are absolute paths - Paths that don’t start with a
/match anywhere in the tree - Use a
!prefix to perform negation (include a file despite other rules that would otherwise exclude it)
Step 5. Create the Backup Script
We’re finally at the point of creating our script that will do all of the hard work of running our backup, reporting the status of the run, and even pruning the old backups. Create a script at /usr/local/bin/restic-backup.sh with the following contents:
#!/bin/bash

# Load credentials
source /root/.restic/b2-credentials

# The ping URL for healthchecks
HEALTHCHECK_URL="<your_healthchecks_io_url_here>"

# Set log file
LOG_FILE="/var/log/restic-backup.log"

# Function to log messages
log_message() {
    echo "[$(date '+%Y-%m-%d %H:%M:%S')] $1" | tee -a "$LOG_FILE"
}

# Function to ping healthchecks.io
ping_healthcheck() {
	local status="$1"
	curl -fsS -m 10 --retry 3 "${HEALTHCHECK_URL}${STATUS}" > /dev/null 2>&1
}

log_message "Starting backup..."

# Ping start of the backup
ping_healthcheck "/start"

# Run backup
restic backup \
    /home \
    /mnt/photography \
    --exclude-file=/root/.restic/exclude.txt \
    --verbose \
    2>&1 | tee -a "$LOG_FILE"

BACKUP_EXIT_CODE=${PIPESTATUS[0]}

if [ $BACKUP_EXIT_CODE -eq 0 ]; then
    log_message "Backup completed successfully"
else
    log_message "Backup failed with exit code $BACKUP_EXIT_CODE"
fi

# Prune old backups (keep last 7 daily, 4 weekly, 6 monthly)
log_message "Pruning old backups..."
restic forget \
    --keep-daily 7 \
    --keep-weekly 4 \
    --keep-monthly 6 \
    --prune \
    2>&1 | tee -a "$LOG_FILE"

PRUNE_EXIT_CODE=${PIPESTATUS[0]}

if [ $PRUNE_EXIT_CODE -eq 0 ]; then
    log_message "Pruning completed successfully"
else
    log_message "Pruning failed with exit code $PRUNE_EXIT_CODE"
fi

# Check repository integrity (optional, can be resource-intensive)
# Uncomment to enable weekly checks
# if [ $(date +%u) -eq 7 ]; then
#     log_message "Running repository check..."
#     restic check 2>&1 | tee -a "$LOG_FILE"
# fi

log_message "Backup script finished"

# Report the status to healthchecks.io
if [ $BACKUP_EXIT_CODE -eq 0 ] && [ $PRUNE_EXIT_CODE -eq 0 ]; then
	ping_healthcheck ""
	exit 0
else
	# Failure - send last 20 lines of log to healthchecks.io
	tail -n 20 "$LOG_FILE" | curl -fsS -m 10 --retry 3 --data-binary @- "${HEALTHCHECK_URL}/fail"
	exit 1
fi
Be sure to replace the <your_healthchecks_io_url_here> with your unique healthchecks.io ping URL from step 2. You can also optionally edit the restic forget command to adjust how many old backups you want to keep. Once you’re happy with the script, mark it as executable:
sudo chmod +x /usr/local/bin/restic-backup.sh
Step 6. Initialize the Repository
We’re almost ready to test our backup script to make sure everything is working, but, before we do, we need to first initialize our remote repository. This is a step that you only need to do once. Also, notice that we need to do this all as root.
sudo su
source /root/.restic/b2-credentials
restic init

# Remember to leave root ;)
exit
Step 7. Test your Backup
Assuming everything worked with initializing your remote repository, you’re now ready to test your backup script. This step will also complete the task of performing your initial backup. Obviously, this run could take quite a while depending on how much data you have to back up. To test the script, just manually kick it off:
sudo /usr/local/bin/restic-backup.sh
Again, this could take an extremely long time since it’s performing the initial backup. Regardless of how long it takes, we can check that everything worked as expected when done. For one, you should be able to notice in your healthchecks.io dashboard that you had a successful ping to your check url. You can also check the log file at /var/log/restic-backup.log to check that everything went well. Finally, I recommend checking that restic actually properly reports the snapshot that you just took:
sudo su
source /root/.restic/b2-credentials
restic snapshots
exit
Step 8. Automate It!
Assuming your test of the backup script went well, you will now have an initial snapshot of your data and the script to continuously take new snapshots and clean up the old ones. At this point, however, we haven’t actually automated the process. To this, we’re going to use good ol’ systemd timers. To start, create a new service by adding a file at /etc/systemd/system/restic-backup.service with the following contents:
[Unit]
Description=Restic Backup Service
After=network-online.target
Wants=network-online.target

[Service]
Type=oneshot
ExecStart=/usr/local/bin/restic-backup.sh
User=root
Group=root
Now, let’s add a timer to kick this service off on a schedule by adding a file at /etc/systemd/system/restic-backup.timer with the following contents:
[Unit]
Description=Run Restic Backup Daily
Requires=restic-backup.service

[Timer]
OnCalendar=daily
OnCalendar=02:00
Persistent=true

[Install]
WantedBy=timers.target
Finally, let’s enable and start the timer:
sudo systemctl daemon-reload
sudo systemctl enable restic-backup.timer
sudo systemctl start restic-backup.timer
You can verify that the timer is now running by checking its status:
sudo systemctl status restic-backup.timer
Sit Back and Relax!
At this point, your backups should be fully automated! As some added peace of mind, you should have everything set up with healthchecks.io, which you can use to automatically send you alerts via email or even SMS if something doesn’t go as expected.
Some Useful Restic Commands
Before I leave you, I figured I’d share some restic commands that are useful to know. Remember to run these commands as root by performing the following first:
sudo su
source /root/.restic/b2-credentials
Viewing Backups
# List all Snapshots
restic snapshots

# List files in a snapshot
restic ls latest

# Show statistics about your backups
restic stats
Restoring Files
# Restore an entire snapshot into a directory
restic restore latest --target /tmp/restore_directory

# Restore a specific file/directory
restic restore latest --target /tmp/restore_directory --include /path/to/file/directory/to/restore
Maintenance
# Check the integrity of your repository
restic check

# Unlock the repository (you may need to do this if you crash in the middle of a backup)
restic unlock