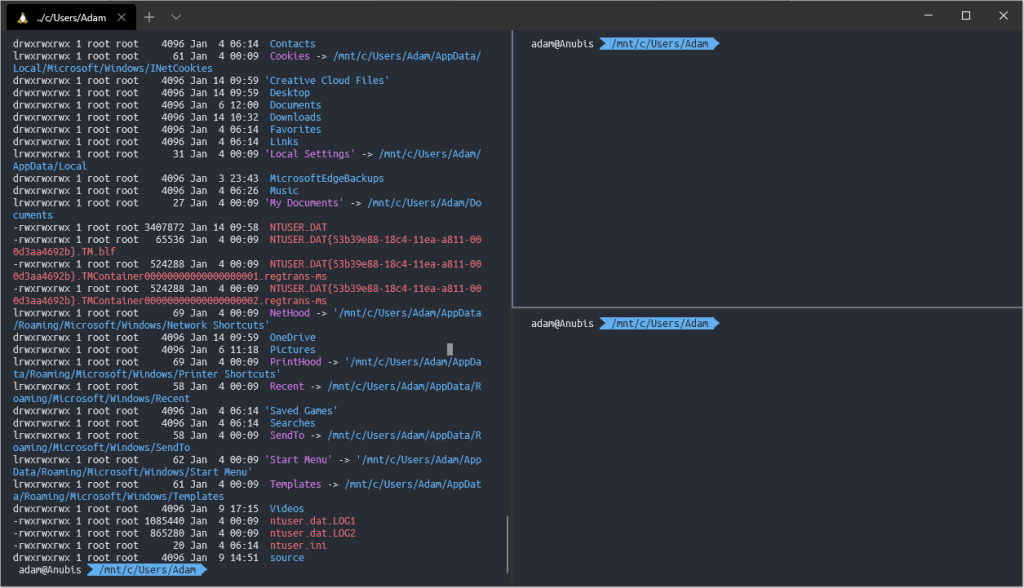
I’ve had a long history of not being a fan of the Windows operating system. While Windows 7 was a decent release of the OS, version eight was an absolute dumpster fire and the early builds of Windows 10 weren’t much better. The more recent builds of Windows 10, however, have certainly started to win me over, especially when Microsoft surprised everyone by coming out with the Windows Subsystem for Linux .
The default setup for WSL is anything but perfect but it’s possible to get a really nice looking, highly functional setup with just a little bit of work. Let’s take a look at how I have everything set up.
Windows Termianl
The first thing we want to do is get rid of the God awful ConHost terminal that WSL uses by default. Luckily, Microsoft is working on rolling out a new Windows Terminal application that is much more modern. It’s still marked as a preview application, but it has been working great for me. You can download it from the Microsoft App Store .

The new terminal app allows you to fully customize it, supports tabs and even allows you to split the view into multiple panes without needing a tool like Tmux.
Windows Terminal Settings
As I said before, the new Terminal application is fully customizable. You adjust the settings via a json file, which makes everything extremely easy to tweak and backup. Rather than diving into all of the options, I’ll just share my personal configuration here. There’s a whole lot that you can play with in here!
  1// To view the default settings, hold "alt" while clicking on the "Settings" button.
  2// For documentation on these settings, see: https://aka.ms/terminal-documentation
  3{
  4    "$schema": "https://aka.ms/terminal-profiles-schema",
  5    "defaultProfile": "{2c4de342-38b7-51cf-b940-2309a097f518}",
  6    "showTerminalTitleInTitlebar" : true,
  7    "profiles":
  8    [
  9    {
 10            "guid": "{2c4de342-38b7-51cf-b940-2309a097f518}",
 11            "hidden": false,
 12            "name": "Ubuntu",
 13            "source": "Windows.Terminal.Wsl",
 14            "colorscheme": "One Half Dark",
 15            "alwaysShowTabs": true,
 16            "fontFace": "Ubuntu Mono derivative Powerline",
 17            "fontSize" : 11,
 18            "historySize": 9001,
 19            "padding": "15, 9, 15, 9",
 20            "useAcrylic": false
 21        },
 22        {
 23            // Make changes here to the powershell.exe profile
 24            "guid": "{61c54bbd-c2c6-5271-96e7-009a87ff44bf}",
 25            "name": "Windows PowerShell",
 26            "commandline": "powershell.exe",
 27            "hidden": false,
 28            "colorscheme": "Solarized Dark",
 29            "fontSize": 10
 30        },
 31        {
 32            // Make changes here to the cmd.exe profile
 33            "guid": "{0caa0dad-35be-5f56-a8ff-afceeeaa6101}",
 34            "name": "cmd",
 35            "commandline": "cmd.exe",
 36            "hidden": false,
 37            "fontSize": 10,
 38            "colorscheme": "Campbell"
 39        },
 40        {
 41            "guid": "{b453ae62-4e3d-5e58-b989-0a998ec441b8}",
 42            "hidden": true,
 43            "name": "Azure Cloud Shell",
 44            "source": "Windows.Terminal.Azure"
 45        }
 46    ],
 47    // Add custom color schemes to this array
 48    "schemes": [],
 49    // Add any keybinding overrides to this array.
 50    // To unbind a default keybinding, set the command to "unbound"
 51    "keybindings": [
 52        {
 53            "command": "closeTab",
 54            "keys": [
 55                "ctrl+w"
 56            ]
 57        },
 58        {
 59            "command": "newTab",
 60            "keys": [
 61                "ctrl+t"
 62            ]
 63        },
 64        {
 65            "command": "newTabProfile0",
 66            "keys": [
 67                "ctrl+shift+1"
 68            ]
 69        },
 70        {
 71            "command": "newTabProfile1",
 72            "keys": [
 73                "ctrl+shift+2"
 74            ]
 75        },
 76        {
 77            "command": "newTabProfile2",
 78            "keys": [
 79                "ctrl+shift+3"
 80            ]
 81        },
 82        {
 83            "command": "nextTab",
 84            "keys": [
 85                "ctrl+tab"
 86            ]
 87        },
 88        {
 89            "command": "prevTab",
 90            "keys": [
 91                "ctrl+shift+tab"
 92            ]
 93        },
 94        {
 95            "command" : "switchToTab0",
 96            "keys" :
 97            [
 98                "alt+1"
 99            ]
100        },
101        {
102            "command" : "switchToTab1",
103            "keys" :
104            [
105                "alt+2"
106            ]
107        },
108        {
109            "command" : "switchToTab2",
110            "keys" :
111            [
112                "alt+3"
113            ]
114        },
115        {
116            "command" : "switchToTab3",
117            "keys" :
118            [
119                "alt+4"
120            ]
121        },
122        {
123            "command" : "switchToTab4",
124            "keys" :
125            [
126                "alt+5"
127            ]
128        },
129        {
130            "command" : "switchToTab5",
131            "keys" :
132            [
133                "alt+6"
134            ]
135        },
136        {
137            "command" : "switchToTab6",
138            "keys" :
139            [
140                "alt+7"
141            ]
142        },
143        {
144            "command" : "switchToTab7",
145            "keys" :
146            [
147                "alt+8"
148            ]
149        },
150        {
151            "command" : "switchToTab8",
152            "keys" :
153            [
154                "alt+9"
155            ]
156        }
157    ]
158}
ZSH and Oh My ZSH
My shell of choice is ZSH with Oh My ZSH installed to help make ZSH a bit nicer. To get started, you need to install some base dependencies:
1sudo apt install zsh git
Next up we need to install Oh My ZSH, which can be done by simply running the following command:
1sh -c "$(curl -fsSL https://raw.githubusercontent.com/robbyrussell/oh-my-zsh/master/tools/install.sh)"
Finally, we can set ZSH as the default shell in WSL. To do this, edit your ~/.bashrc file to include the following at the top:
1if test -t 1; then
2    exec zsh
3fi
Configuring the ZSH Theme
My personal theme of choice for ZSH is agnoster, so I change the ZSH_THEME variable in my ~/.zshrc file to use agnoster. When you do this, you’ll notice that there are some issues caused by the fonts used by the theme. You can fix this by installing the power line fonts, which you can get by cloning the git repository and running the install script in a PowerShell with admin privileges:
1git clone https://github.com/powerline/fonts.git
2.\install.ps1
NOTE: You’ll notice in the Windows Terminal config that I included at the start of this post that I have it set to use a powerline font for the Ubuntu session.
Fixing Directory Colors
By default, using ls will result in some really ugly colors that makes the text extremely hard to read. I fixed this by installing a Solarized color theme for the directory color outputs. First, we need to obtain the color scheme:
1curl https://raw.githubusercontent.com/seebi/dircolors-solarized/master/dircolors.ansi-dark --output ~/.dircolors
Next, add the following to the ~/.zshrc file:
1# Set directory colors for ls
2eval `dircolors ~/.dircolors`